


This post applies to a previous version of Stackbit.
Please check out our docs for all current web frameworks & content sources that we support.
Overview
For this tutorial we are going to use the following process:
- Overview how Stackbit works
- Prepare our development environment
- Create the stackbit.yaml file in the Jekyll theme and add required fields
- Define content models in stackbit.yaml
- Validate our theme with the Stackbit CLI validator
- Import the converted theme to Stackbit and connect it to a CMS of your choice.
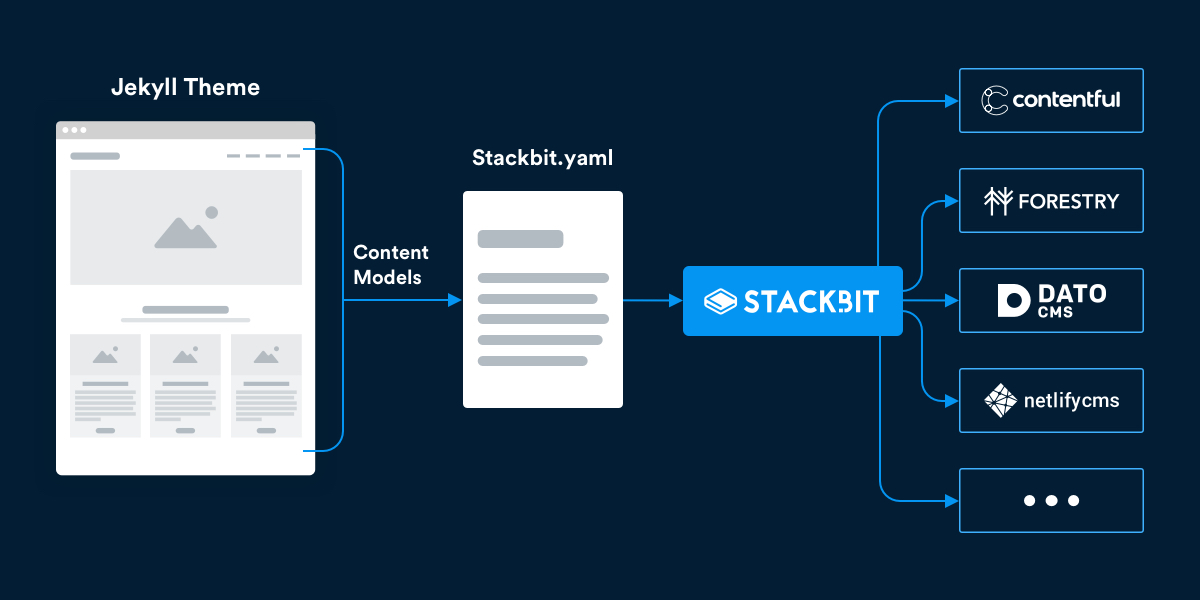
Overview How Stackbit Works
To make your Jekyll theme work with Stackbit, you will need to create the stackbit.yaml file in the root folder of your theme. In this file you will define content models which map your theme content to a structured schema.
Prepare Our Development Environment
To start things off, first create the Stackbit account. Then fork the repo at uniform-jekyll-tutorial and clone it to your local machine. It will be our starting point. For testing and debugging we will need to install Unibit CLI from Stackbit. It will help us to validate the theme.
npm install -g @stackbit/unibit
After the installation is complete, we are ready to go.
Create the stackbit.yaml File in the Jekyll Theme and Add Required Fields
When you have the repo cloned and Unibit CLI set up on your local machine, let's move on and create the stackbit.yaml file in the Jekyll theme root directory. After you did that, add the basic fields to the file:
stackbitVersion: ~0.2.0
ssgName: jekyllTry Unibit CLI and validate Jekyll theme with the unibit validate command. Since we've added basic configuration to the stackbit.yaml file, Unibit tries to fill out the rest of the fields as it knows we are using Jekyll.
The next step is to add the required fields to the file. As the name suggests these fields should be present in every stackbit.yaml file:
stackbitVersion: "~0.2.0"
ssgName: jekyll
staticDir: ""
uploadDir: images
buildCommand: "gem install jekyll bundler && bundle install && bundle exec jekyll build"
publishDir: "_site"
dataDir: ""
pagesDir: ""If you want to learn more about these fields, please head on to the Stackbit Docs.
Define Content Models in stackbit.yaml
Now we begin the most interesting part, adding content models to the stackbit.yaml file. These models are necessary for CMS to understand your content in a structured way. There are a few types of content models — page models, data models, field models and object models. We use page models to map all our pages, data models to map everything that is inside the data directory and in the config.yml file, and field models to define individual fields of page, data and object models.
Before we begin creating content models, let's create the list of what kind of content and data we have in our theme and what kind of models we will use for it:
Page Models
- Posts
- Pages
- Tags page
- 404 page
Data Models
- Author information
- Social links
- config.yml
To start creating content models, add models: to the stackbit.yaml file below the pageTemplateKey: layout field. All other models (page, data and object) are nested under this field:
stackbitVersion: "~0.2.0"
ssgName: jekyll
staticDir: ""
uploadDir: images
buildCommand: "gem install jekyll bundler && bundle install && bundle exec jekyll build"
publishDir: "_site"
dataDir: ""
pagesDir: ""
pageTemplateKey: layout
models:Create Models for config.yml Options
The config file in our theme has quite a few options and we need them to be accessible in CMS. So we create the config model and specify its type, label, file and fields:
models:
  config:
    type: data
    label: Config
    file: _config.yml
fields:Under the fields key we specify options of the config file. For example, let's define the lang option
# Site language
lang: en-USin the stackbit.yaml file:
models:
  config:
    type: data
    label: Config
    file: _config.yml
    fields:
      - type: string
        name: lang
        label: Site Language
description: The language of the site used in HTML lang attribute.Let's explore the fields we just added as we will keep using this pattern. Fields type and name are required. Field name should be the same as the option in the _config.yml file of our theme. Field type should specify what type of data CMS can expect from this model. For example, the string type will create a single-line plain text input field, the boolean type a true/false toggle, the image type an image upload widget, etc. Field label should have a short, human-readable label for the field. Field description is optional, but I recommend you to add it to make it easier for the user to navigate CMS.
Following the same pattern, we model other options from the _config.yml file:
models:
  config:
    type: data
    label: Config
    file: _config.yml
    fields:
      - type: color
        name: accent_color
        label: Accent Color
        description: The accent color of the theme.
        required: true
      - type: string
        name: lang
        label: Site Language
        description: The language of the site used in HTML lang attribute.
      - type: string
        name: title
        label: Site Title
        description: The title displayed in the site header, title tag, search-engine results.
      - type: string
        name: description
        label: Description
        description: The default description displayed in meta tags, search-engine results.
      - type: string
        name: baseurl
        label: Baseurl
        description: The subpath of your site, e.g. /blog, for generating urls.
      - type: string
        name: url
        label: Url
        description: The base hostname and protocol of your site for where absolute urls are needed.
      - type: string
        name: permalink
        label: Permalink
        description: The permalink pattern.
      - type: image
        name: favicon
        label: Favicon
        description: The icon image associated with your website.
      - type: string
        name: disqus
        label: Disqus Username
description: The shortname for your Disqus site to enable comments.There are few options in _config.yml that are more complex. Let's take a closer look at them. Here is how navigation is defined in the _config.yml file:
# _config.yml
...
# Site navigation - each item must have a title and a url.
navigation:
  - text: Home
    url: /
  - text: About
    url: /about/
  - text: Style Guide
    url: /style-guide/
  - text: Tags
    url: /tags/
  - text: Download
url: https://github.com/JustGoodThemes/Scriptor-Jekyll-ThemeSince this is the array of items, we will use type list. Each navigation item is described by text and url fields and to model navigation items we will use type object:
# stackbit.yaml

- type: list
  name: navigation
  label: Header Navigation
  items:
    type: object
    labelField: text
    fields:
      - type: string
        name: text
        label: Title
        required: true
      - type: string
        name: url
        label: URL
required: trueNext, we have the list of plugins the theme uses:
# Plugins
plugins:
- jekyll-paginateSince this is the array, we will use type list again, and to model the plugin items we specify type string as this is a simple list of strings:
- type: list
  name: plugins
  label: Plugins
  items:
type: stringNow we have the site footer and Sass configuration options left:
# Site footer
footer:
  content: "© Scriptor all rights reserved. Theme by [JustGoodThemes](https://www.justgoodthemes.com)."
has_social: true# Sass
sass:
sass_dir: _sass
style: compressedTo model them, we use already familiar type object:
- type: object
  name: footer
  label: Footer Configuration
  fields:
    - type: markdown
      name: content
      label: Footer Content
      description: The copyright text displayed in the footer.
    - type: boolean
      name: has_social
      label: Enable social links?
default: true- type: object
name: sass
label: Sass Configuration
hidden: true
fields:
- type: string
name: sass_dir
label: Sass Files Directory
- type: string
name: style
label: StyleOne thing to note regarding the Sass field model, I've added the hidden: true field since I want this option to be hidden in CMS. This option is not important and I don't want to overwhelm theme users with too many choices.
Create Models for _data Directory Contents
In the _data directory of the theme we have two files — author.json and social.json. Let's start with author.json that contains the author data:
{
  "name": "John Doe",
  "bio": "John is a designer, photographer, speaker, author of a couple of books about typography and the founder of photo magazine Curious.",
  "url": "http://justgoodthemes.com",
  "location": "Vilnius, Lithuania",
  "image": "/images/author.png"
}Let's create a content model for it by specifying the type of the model, file path relative to the _data directory and the label:
author:
  type: data
  file: "_data/author.json"
label: AuthorNext, we add the fields:
author:
  type: data
  file: "_data/author.json"
  label: Author
  fields:
    - type: string
      name: name
      label: Name
      description: The name of the author.
    - type: markdown
      name: bio
      label: Bio
      description: The short bio of the author.
    - type: string
      name: url
      label: URL
      description: The URL of the author.
    - type: string
      name: location
      label: Location
      description: The location of the author.
    - type: image
      name: image
      label: Avatar
description: The profile image of the author.We specify the necessary types for our field models to let CMS know what kind of data it is and what to do with that data. For instance, we use image for the author avatar to create an image upload widget and markdown for the author bio to create a rich text input that will be run through markdownify filter.
Similarly we create the model for social.json.
social:
  type: data
  file: "_data/social.json"
  label: Social Links
  fields:
    - type: list
      name: links
      label: Link
      description: A list of social links displayed in the footer.
      items:
        type: object
        labelField: title
        fields:
          - type: string
            name: title
            label: Title
            description: The title of the icon.
          - type: string
            name: icon
            label: Icon
            description: Font Awesome icon class name.
            required: true
          - type: string
            name: url
            label: URL
            description: The URL to your social profile.
widget: urlCreate Model for Posts
Next, we will create the content model for our theme posts. This time we don't need to map a specific file or page, but instead we need to create a reusable abstraction posts as all our posts have the same front matter. Here is how the front matter from the post looks like:
---
layout: post
title: "The Advantages & Disadvantages of Working from Home"
description: "A work at home parent is an entrepreneur who works from home and integrates parenting into his or her business activities."
date: 2019-01-01
feature_image: images/desk.jpg
tags: [tips, work]
---Let's create a content model for it. We will follow the same pattern as in previous content models, just this time we will use the page content model and additionally specify template: post to tell CMS what kind of template will be used for this model and folder: _posts to tell where our posts are located.
post:
  type: page
  label: Post
  template: post
folder: _postsNow under the fields key we will define all the data from the post front matter:
post:
  type: page
  label: Post
  template: post
  folder: _posts
  fields:
    - name: title
      type: string
      label: Title
      description: The title of the post
      required: true
    - name: description
      type: string
      label: Description
      description: The description used in meta tags.
    - name: date
      type: date
      label: Date
      description: The publish date of the post.
      required: true
    - name: feature_image
      type: image
      label: Feature image
      description: The featured image of the post.
    - name: tags
      type: list
      label: Tags
      items:
type: stringCreate Model for Pages
Next, we will create a reusable model for theme pages. It will be similar to the posts model, just this time we don't need to specify the folder where the pages are as they are stored in the theme root directory and the front matter doesn't have fields like tags and date. Let's look at the front matter of the theme pages:
---
layout: page
title: About this blog
description: An optional about page for Scriptor Jekyll theme
feature_image: images/about.jpg
---And the model for this front matter will be:
page:
  type: page
  label: Page
  template: page
  fields:
    - type: string
      name: title
      label: Title
      description: The title of the page.
      required: true
    - type: string
      name: description
      label: Description
      description: The description used in meta tags.
    - name: feature_image
      type: image
      label: Feature image
description: The featured image of the page.Create Model for the Tags Page
Since our tag page uses different layout we have to create a separate model for it. Here is how the front matter for the tag page looks:
---
layout: tags
title: Tags
description: A tags page for Scriptor Jekyll theme
---Let's define the model for it:
tags:
  type: page
  label: Tags Page
  template: tags
  file: tags.md
  hideContent: true
  singleInstance: true
  fields:
    - type: string
      name: title
      label: Title
      required: true
    - type: string
      name: description
      label: Description
description: The description used in meta tags.The model is the very similar to the one we defined for the theme pages, it just has few additional fields. Since there can be only one instance of tag pages, we specify singleInstance: true. If singleInstance is set to true, we need to specify the file as well, i.e. file: tags.md. Also, as this page doesn't have markdown content, we specify hideContent: true to hide the content input in the CMS.
Create Model the Error 404 Page
We will finish page models with the 404 page. This is the front matter from the 404 page:
---
layout: page
title: Page Not Found
permalink: /404.html
feature_image: images/404.jpg
---Now we will create a new page model "notfound" and specify the necessary fields like in previous models:
notfound:
  type: page
  label: 404 Page
  singleInstance: true
  file: 404.md
  template: page
  fields:
    - type: string
      name: title
      label: Title
      description: The title of the page.
      required: true
    - type: string
      name: description
      label: Description
      description: The description used in meta tags.
    - name: feature_image
      type: image
      label: Feature image
      description: The featured image of the page.
    - type: string
      name: permalink
      label: Permalink
description: The permalink of the page.Validate Our Theme with the Stackbit CLI Validator
Now when we have defined all content models for our theme, let's run the validator again (unibit validate) and check if we haven't missed anything.
Validating Model
✔ loading stackbit.yaml
✔ validating stackbit.yaml fields
✔ models.config
✔ models.author
✔ models.social
✔ models.post
✔ models.page
✔ models.tags
✔ models.notfound

Loading Theme
ssgName: jekyll

Site Configuration
  stackbitVersion: "~0.2.0"
  ssgName: "jekyll"
  buildCommand: "gem install jekyll bundler && bundle install && bundle exec jekyll build"
  publishDir: "_site"
  staticDir: ""
  dataDir: ""
  pagesDir: ""
  pageLayoutKey: "layout"
...

Validating Data
✔ _config.yml
✔ author.json
✔ social.json

Validating Pages
✔ matching pages to models
✔ notfound ⇔ 404.md
✔ post ⇔ _posts/2019-01-01-the-advantages-and-disadvantages-of-working-from-home.md
✔ post ⇔ _posts/2019-01-02-set-up-your-new-iphone-6-the-Right-Way.md
✔ post ⇔ _posts/2019-01-03-basic-rules-for-walking-in-the-mountains.md
✔ post ⇔ _posts/2019-01-04-a-week-with-the-apple-watch.md
✔ post ⇔ _posts/2019-01-05-Graphic-Designer-On-The-Road.md
✔ page ⇔ about.md
✔ page ⇔ style-guide.md
✔ tags ⇔ tags.md

ℹ All OKOur theme has passed the validation and now we are ready to import it into Stackbit.
Import the Converted Theme to Stackbit and Connect to a CMS of Your Choice
Visit https://app.stackbit.com/create and import your theme.
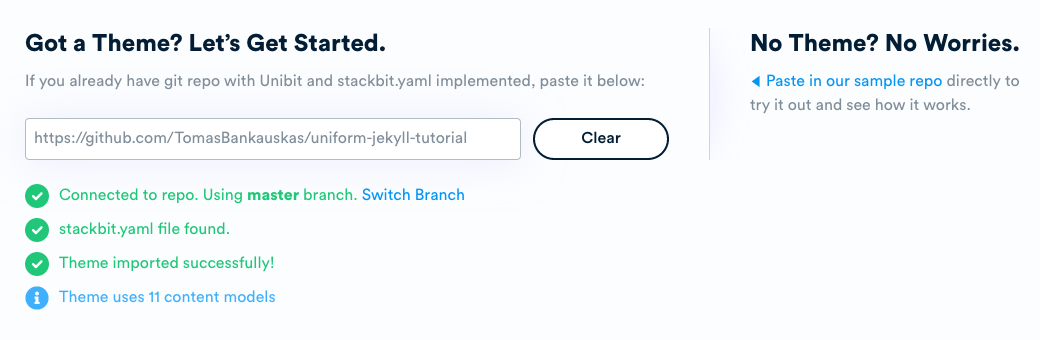
Stackbit will check the theme again, and if everything is OK, you can select the CMS you want and let Stackbit connect your theme to the CMS and deploy it to Netlify.
Trying Out Different CMSs the Easy Way
With Stackbit and Uniform theme (a theme with the stackbit.yaml file), you can explore different CMSs quick and easy. For example, if you have never tried Dato or Contentful CMS before, you can do it now with just a few clicks and see if these CMS's are the right choice for you.
Conclusion
This Jekyll Uniform theme tutorial was quite long but hopefully you’ve seen that Jekyll and Stackbit make an incredible duo for spinning rapid JAMstack sites on Netlify.
Further Reading
- Uniform spec
- Tutorial: Adding Stackbit to a Hugo theme In this tutorial you will learn how to convert your Jekyll theme to a Stackbit Uniform theme. With Stackbit Uniform, you can connect your theme to headless CMS and deploy it to Netlify in minutes.