


Yes, we all get far too much emails. There's basically a whole sub-genre of memes dedicated to the topic, such as...
Nonetheless, newsletters and mailing lists are often one of the most effective ways we have to communicate with our users, customers, readers, etc. So, what if I wanted to create a simple form on my site that let people enter their email and sign up for my mailing list. In this post, we'll quickly look at how you can add a newsletter sign up form to a Gatsby site that automatically subscribes a user to a mailing list on Mailchimp. The site we'll work on was built built using Stackbit, so if you used Stackbit to build your Gatsby site, it'll be easy to follow along, however there is nothing Stackbit specific about the code and integrations. You can find the code in this sample project, where I've been working on a number upgrades to an existing Stackbit generated site.
Installing and Configuring the Gatsby Plugin
You probably won't be surprised that Gatsby already has a plugin to integrate with Mailchimp. We'll take advantage of this as it makes the process of adding a subscription form much simpler. Start by installing the plugin into your existing project:
npm install gatsby-plugin-mailchimpThe plugin has very a minimal amount of required configuration. While it has some additional options that you can read about in the documentation, the only required configuration parameter is a Mailchimp endpoint. For example, here is the configuration added to plugins within my gatsby-config.js:
...
{
  resolve: 'gatsby-plugin-mailchimp',
  options: {
      endpoint: 'https://remotesynthesis.us6.list-manage.com/subscribe/post?u=231f8aff82a1f82e4d6ab23d8&id=d00ad8719a'
  }
}To obtain your enpoint URL, log into your Mailchimp account and go to "Audience" > "All Contacts" from the top navigation. Once there, click "Signup forms" and then "Embedded forms". This will open a page with HTML that you can copy to add an embedded form on your site. However, we don't want the full embedded form code as we are creating a custom form. We only want the endpoint URL in the action attribute of the form as seen below.
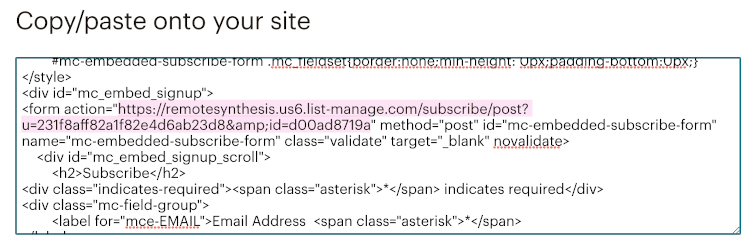 Paste that URL into the
 endpoint option for the plugin configuration and we are done with configuration.
Updating the Form Code
You can create your subscribe form code from scratch depending on what site you are working on. If you are building your own, you can skip ahead to the finished component. In my case, my site was generated using Stackbit's Azimuth template that already has an existing SubscribeForm.js component that renders a mailing list sunscription form. It has been preconfigured to submit directly to Netlify's Forms functionality. Here's the code:
import React from 'react';
export default class SubscribeForm extends React.Component {
  render() {
    return (
      <form name="subscribeForm" method="POST" netlifyHoneypot="bot-field" data-netlify="true" id="subscribe-form" className="subscribe-form">
        <div className="screen-reader-text">
          <label>
            Don't fill this out if you're human: <input name="bot-field" />
          </label>
        </div>
        <div className="form-row">
          <label>
            <span className="screen-reader-text">Email address</span>
            <input className="subscribe-email" type="email" name="email" placeholder="Enter Email Address..." />
          </label>
        </div>
        <input type="hidden" name="form-name" value="subscribeForm" />
        <button className="button" type="submit">
          Subscribe
        </button>
      </form>
    );
  }
}First, let's remove the code specific to Netlify Forms. Remove the netlifyHoneypot="bot-field" data-netlify="true" from the form tag. Remove the entire div containing the bot-field hidden form field. Finally, remove the hidden form-name field.
The finished form component is simple, only containing a single form input for the email and a submit button. It should look something like this:
import React from 'react';
export default class SubscribeForm extends React.Component {
  render() {
    return (
      <form name="subscribeForm" method="POST" id="subscribe-form" className="subscribe-form">
        <div className="form-row">
          <label>
            <span className="screen-reader-text">Email address</span>
            <input className="subscribe-email" type="email" name="email" placeholder="Enter Email Address..." />
          </label>
        </div>
        <button className="button" type="submit">
          Subscribe
        </button>
      </form>
    );
  }
}Connecting the Form to Mailchimp
The first thing we'll need to do is add state to the component. The first item will be email that will represent the input from the form and the second is message that will hold the response sent back from Mailchimp via the plugin (this already sends friendly HTML formatted messages we can use). The handleInputChange method is taken directly from Gatsby's handling forms documentation for updating the state based upon form input changes.
state = {
  email: '',
  message: ''
};
handleInputChange = (event) => {
  const target = event.target;
  const value = target.value;
  const name = target.name;
  this.setState({
    [name]: value
  });
};Next, let's connect the value of our email input to the component state and handle updating the state.
<input
  className="subscribe-email"
  type="email"
  name="email"
  placeholder="Enter Email Address..."
  value="{this.state.email}"
  onChange="{this.handleInputChange}"
/>Next, we need some way to display the message response to the user. We'll want that to be highlighted in some meaningful way. For example, within Azimuth, I added a new style to _general.scss under the subscribe form section that uses the bright orange accent color already configured in the styles.
.message {
  color: _palette(accent-orange);
}Now let's add the message to the form by adding a div before the form-row containing the email input.
<div className="message" dangerouslySetInnerHTML="{{" __html: this.state.message}} />Now we're ready to make the final connection to the plugin. Of course, we need to add the plugin to our imports.
import addToMailchimp from 'gatsby-plugin-mailchimp';Let's add the submit handler. The code for this is only a few lines, passing the email to the call to Mailchimp and setting the message in our state to the message in the response.
handleSubmit = async (e) => {
  e.preventDefault();
  const result = await addToMailchimp(this.state.email);
  this.setState({ message: result.msg });
};Finally, we just need to wire the form to call this function when the user clicks submit by adding an onsubmit handler to the form:
onSubmit={this.handleSubmit}The Form in Action and Next Steps
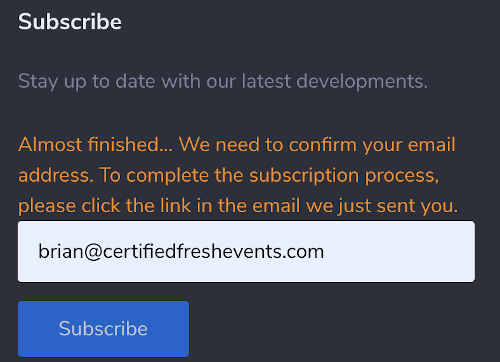
We're done! Let's go ahead and test this out. I've connected mine to an existing mailing list I had for new and throwback music picks called Coda Breaker. Entering an email address that is not yet subscribed will display a message indicating that they need to confirm their subscription as that is how our email list is configured in Mailchimp.
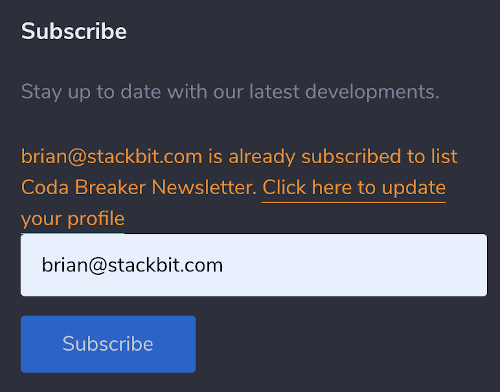
 If I enter an email address that is already subscribed, I'll get an error message like the following:
 Moving forward, you may want to expand your form to include more information about the user for your list, and that is completely possible using the plugin. The plugin allows for a second parameter to the
 addToMailchimp function called listFields, which is a structure containing additional values about the user for your list. You can reference the plugin documentation for more details.
Documentation sites are a longstanding and common use case for the JAMstack. In this post we explore some of the options available to you for developing them and show an example of how to build one.