


One of the earliest use cases for static site generators (SSGs), which are a key ingredient in the JAMstack, was for documentation sites and particularly technical documentation. Certain special factors led to SSGs being a good solution for documentation sites, even in the early days where they were largely just tools for "static sites." These include the ability to version file-based content easily via source control, the ability to accept contributions and corrections via processes like a GitHub pull request, and the fact that, in many cases, the authors were technically adept with these sorts of development tools.
The good news is that both the tooling and the ecosystem have improved tremendously in recent years to where the JAMstack is likely a perfect fit for just about any kind of documentation site. The prior benefits still apply, but are complimented by an array of tools and services that make the content easier to edit and contributions easier to accept - even from folks who may be unfamiliar with the tools. In this post, we'll explore some of the options available to you for developing documentation sites using the JAMstack and show an example of how to build one.
Considerations for a Docs Site
First, let's think about what type of considerations are typical for a documentation site:
- How big is the site and how often will it update? If you are documenting a small library, your site may be no more than a few pages or even a single page. However, if you are documenting a large project or product, your documentation site is likely to have a lot of pages, even if it doesn't start out that way. The build speed can become a factor if the site is particularly large. However, most documentation sites update fairly infrequently, which can make the build speed a less critical consideration.
- Who is writing the content? Will you allow external contributions? There are a variety of possibilities here that can impact how you build your documentation site. Here are a few examples: Written by a technical internal team. API documentation that is largely generated. Written by non-technical internal authors. Written with the help and contributions of external authors. * A combination of any of the above.
While the first consideration can influence how you evaluate your SSG options (we'll discuss some in just a bit), the second impacts the tools you choose for managing and editing content. For example, an API-based headless CMS may be a great solution for documentation that is largely maintained internally, a git-based solution may be preferable if you intend to allow editing by external users - and which specific CMS of either type you choose can depend partly on the technical level of your contributors.
SSG Options for Documentation
Let me be clear up front: any SSG should work for a documentation site. That being said, there are actually a number of SSGs that are specifically geared towards documentation.
- Docsify
- This is a Javascript-based SSG that serves documentation as a single-page application that can support server-side rendering (SSR).
- Slate
- This is a Ruby-based solution (that uses the Middleman SSG under the covers) and is geared specifically towards API docs.
- MkDocs A Python-based solution that emphasizes its speed and themes (some of which can be found here.
While it isn't a documentation-specific solution, Hugo is a common solution because of its emphasis on build speed. It has a significant number of community themes with designs and features targeted to documentation sites including:
- Ace Documentation is a Bootstrap-based docs theme.
- DocuAPI is geared towards multilingual API documentation.
- Libris is a theme created by Stackbit, which means you can connect it to a CMS and deploy it automatically using the site builder. This also means it can be used with Jekyll or Gatsby.
- Dot is aimed at documentation in the form of a support center or knowledge base.
- Hugo Book is a minimalist book-style theme with features like built-in search.
- Techdoc is also a minimalist book-style theme.
- Kraiklyn is designed for creating single-page documentation.
One of the benefits of Hugo for documentation sites besides the build speed is that it does not rely on a front-end framework. This is not meant to criticize framework-based SSGs, just to note that a front-end framework may add unnecessary weight to a site that, in most cases, is simply geared towards serving text content. Other popular, non-framework-based alternatives for SSGs include Eleventy and Jekyll.
The Example Site
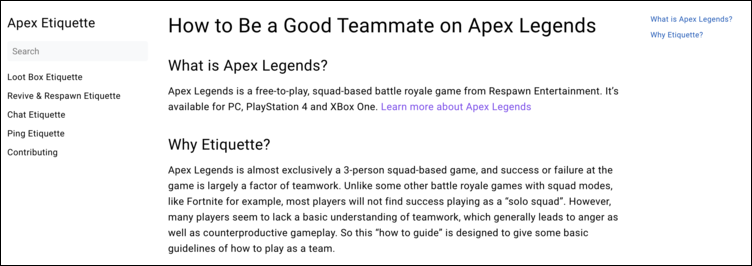
Now that we've covered a lot of the ecosystem of tools and themes that are available for you to develop your JAMstack documentation site, let's look at an example. The example site is simple documentation (of sorts) that teaches people how to be good teammates on the battle royale game Apex Legends. It's a fun game, but, because it is a squad-based game, playing with "randos" can be...ummm...let's say challenging (any of you who've played the game probably know what I'm talking about).
Here were the basic requirements for this example site:
- This is a standard documentation site and not API-documentation or a knowledge base type of site.
- The content will be stored in git as this gives it access to broad collaboration tools that can be open to the public.
- However, users should be able to edit the site without needing to go through a manual fork/pull request process by using an open authoring workflow that gives them access to the CMS.
To achieve these goals, I chose the following:
- Use Hugo as the SSG. While this site won't have a lot of pages to take advantage of the build speed, its content is simple enough that doesn't require a frontend framework and, personally, I am comfortable with Hugo.
- Use a fork of Hugo Book as the documentation layout (note that this differs from the theme's documentation for the theme which suggests adding it as a submodule).
- Use the Netlify CMS beta. Netlify CMS is an open source, git-based CMS that includes open authoring capabilities.
You can view the site at https://apexetiquette.netlify.com/ or grab the code at https://github.com/remotesynth/apexetiquette.
Creating the Example Site
Let's walk through the steps used to create this documentation example.
Creating the site with Hugo and Hugo Book
The first thing to do is install Hugo if you don't have it already. You can follow the installation instructions here for whichever platform you are working on.
Once Hugo is installed, we need to create a new site (note that apexetiquette is the name of my project):
hugo new site apexetiquette
cd apexetiquetteNext, we need to install the Hugo Book theme. The docs for Hugo Book recommend that you install it as a Git Submodule but that presents some limitations as we will need to make some changes to the templates for open authoring later. Instead, let's just clone the repo into our themes folder.
mkdir themes
cd themes
git clone https://github.com/alex-shpak/hugo-bookNow we need to modify our Hugo site to use the new theme. Open the config.toml and add a line for the theme (you can also edit the title at this point as well).
baseURL = "https://apexetiquette.netlify.com/"
languageCode = "en-us"
title = "Apex Etiquette"
theme = "hugo-book"Hugo Book has a number of configuration options. Let's just add the following which enables the built-in site search capability.
[params]
BookSearch = trueAt this point you'll have a site but no docs. First create a home page as /content/_index.md. Then create the docs folder under content (i.e. /content/docs and place your documentation pages there. The only important frontmatter on your posts are title, which determines what the navigation text will be, and weight, which determines the order the pages are displayed in the doc navigation. There are a number of other page configuration options available with Hugo Book as well.
---
title: Revive & Respawn Etiquette
weight: 3
---Once you've populated some content, you can use hugo serve to launch the site. However, I suggest that you use the Netlify CLI and netlify dev as this will make our Netlify CMS testing easier.
One thing worth pointing out is that, during my tests, the Hugo Book template often did not add new pages or detect frontmatter changes in my docs section that affected the navigation without restarting the server. This could have been something particular with my setup but I wanted to mention in case anyone else gets frustrated when not seeing their changes reflected in the site.
Integrating Netlify CMS
Now that we have content and a functioning site, we need to enable it to be edited with Netlify CMS. The first step is to create the admin and add the necessary files. First, create a folder named admin - since this is Hugo, it needs to be placed under the static directory (i.e. /static/admin) as we just want it to be copied to the build as is.
Next, add two files to the admin folder: index.html and config.yml. The index.html file will load the script that runs the CMS admin. We'll use the same code supplied by the docs (Note: we no longer require the beta version as the main version includes open authoring, though the feature is still technically beta - h/t Shawn Erquhart):
<!DOCTYPE html>
<html>
  <head>
    <meta charset="utf-8" />
    <meta name="viewport" content="width=device-width, initial-scale=1.0" />
    <title>Content Manager</title>
  </head>
  <body>
    <!-- Include the script that builds the page and powers Netlify CMS -->
    <script src="https://unpkg.com/netlify-cms@beta/dist/netlify-cms.js"></script>
  </body>
</html>The config.yml will hold the information the CMS needs to manage our content in the repository as well as the content models to know the nature of the content it will be managing. Here's the basic configuration portion first:
publish_mode: editorial_workflow
media_folder: static/images
public_folder: /images
backend:
  name: github
  branch: master
  repo: remotesynth/apexetiquette
open_authoring: trueLet's look at some key elements here. The editorial_workflow is required for open authoring. This is a workflow whereby a draft is created by the user and then, once finalized, submitted for approval by the editor. If you are both the one making edits and an editor, you can approve and publish your own changes. The backend for open authoring has to be github rather than the standard git-gateway as open authoring currently requires GitHub authentication. Finally, of course, we will set open_authoring to true to enable it.
Configuring GitHub and Netlify
Before we move on to the content modeling, we need to add some settings in GitHub and Netlify to enable the GitHub backend we just defined above to work. First, we must create an OAuth app in GitHub by going to our developer settings and clicking "New OAuth App. The important thing to note is the authorization callback, which should be https://api.netlify.com/auth/done.
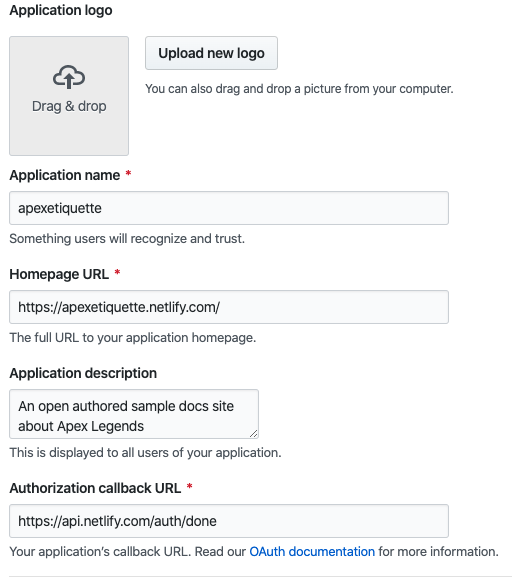
Once this is done, you will receive a client ID and client secret. We'll use those in the next step in Netlify. Go to Settings > Access Control > OAuth and then click the install provider button. Click on "Install provider" and then choose GitHub and paste your client ID and client secret in the form.
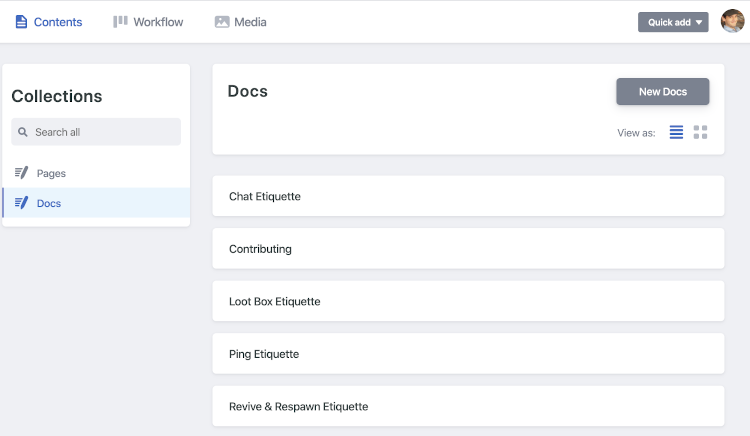
Modeling the Content
The final step to setting up Netlify CMS is to model the content by adding collections. Luckily, our content model is pretty simple and consists of the home page (i.e. /content/_index.md) and any files in the /content/docs folder. Most of our content just has a title, weight and body copy, but, as you'll see below, I've also modeled out some of the optional frontmatter configurations that Hugo Book provides.
collections:
  - name: pages
    label: Pages
    files:
      - name: 'home'
        label: 'Home Page'
        file: 'content/_index.md'
        fields:
          - widget: string
            name: title
            label: Title
            required: true
            hint: >-
              The title of the page
          - widget: markdown
            name: body
            label: Content
            required: true
            hint: Page content
  - name: docs
    label: Docs
    folder: /content/docs
    create: true
    extension: md
    slug: '{{slug}}'
    fields:
      - widget: string
        name: title
        label: Title
        required: true
        hint: >-
          The title of the page that will appear in the left hand navigation
      - widget: number
        name: weight
        label: Weight
        required: false
        hint: >-
          The navigation order of the page.
      - widget: boolean
        name: bookToc
        label: Table of Contents
        required: false
        hint: >-
          If false, the right hand table of contents will not show. Defaults to true if empty.
      - widget: boolean
        name: bookHidden
        label: Hidden?
        required: false
        hint: >-
          If true, the page will not list on the left hand navigation
      - widget: markdown
        name: body
        label: Content
        required: true
hint: Page contentWhile basic content modeling in Netlify CMS is pretty easy in my opinion, there's a lot that Netlify CMS can do that I am not utilizing. Please check the collection parameters for additional configuration options.
Editing the Content as the Site Admin
As the primary content editor, we'll want to edit pages the site directly without going through the open authoring process. The best way to do this is to invite ourselves to the site using Netlify Identity. First, let's set the registration to "invite only" by going to Settings > Identity > Registration and choosing "Edit settings". Next, go to your Netlify site dashboard, choose Identity and then invite yourself as a user. This should trigger a confirmation email - you'll need to click the link in the email to confirm before continuing (this will link to the URL in Netlify, so our admin should be pushed live by now). Note that you can also set this to not require a confirmation by going to Settings > Identity > Notifications > Confirmation Template and setting "autoconfirm" to yes.
Once you've accepted your invite and logged in using GitHub, you should see the site admin, which gives you access to editing the home page and content pages.
Giving External Users Access
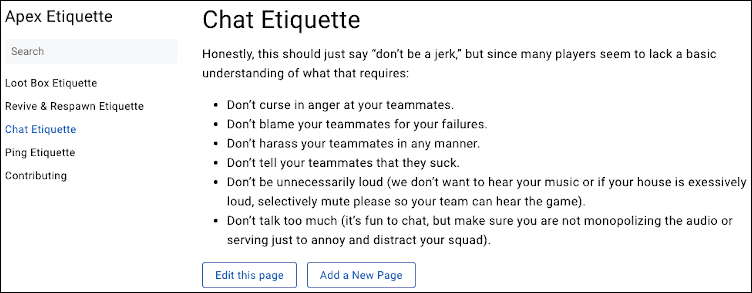
At this point, external users can technically access your admin and submit additions and changes as pull requests. However, we need to give them a way to access this from the main site. Let's tweak the page templates to offer buttons that give them the opportunity to add or edit pages in the docs.
Open /themes/hugo-book/content-after.html. This file contains content that displays after the main page content has rendered and, right now, it should currently be empty. Let's add two buttons.
{{ if ne .RelPermalink "/"}} {{ $edit_url := print "/admin/#/edit" .RelPermalink }}
<p>
<a href="{{$edit_url}}" class="book-btn">Edit this page</a>
<a href="/admin/#/collections/docs/new" class="book-btn">Add a New Page</a>
</p>
{{ end }}The if statement is simply ensuring that this isn't the home page as we want to add these buttons to only the docs pages (technically users can access and submit edits to the home page once in the admin though). The $edit_url is assembling a string that links directly to the current page within Netlify CMS. The "Add a New Page" button simply links to the URL to create a new docs page in the CMS. Since we only have one collection at the moment, a hardcoded link will work here. You should now see the buttons beneath any docs page.
The Open Authoring Workflow
So what happens if an external user clicks either of those buttons? Let's walk through it.
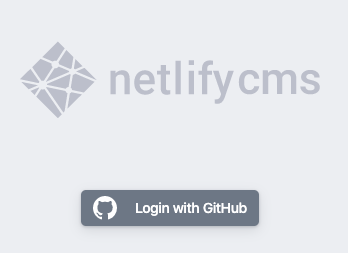
First, they will be asked to login with GitHub. It's worth keeping in mind what kind of documentation you are creating and if this is a good option for you. If your users are unlikely to have a GitHub account, this may not be the best option.
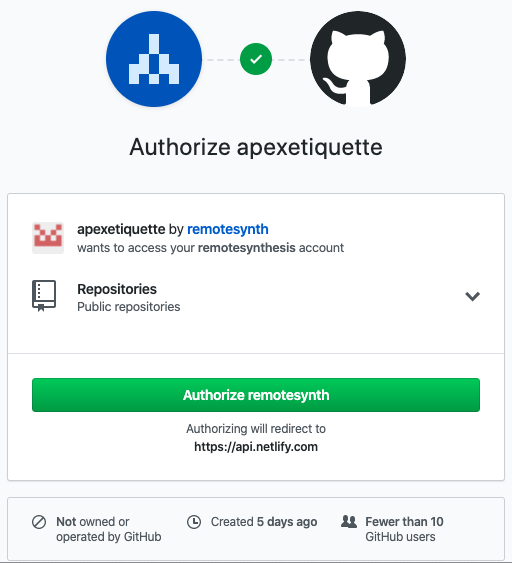
When they click the login button, it will open a window to authorize the application where they will be asked to grant access to public repositories so that a fork can be created.
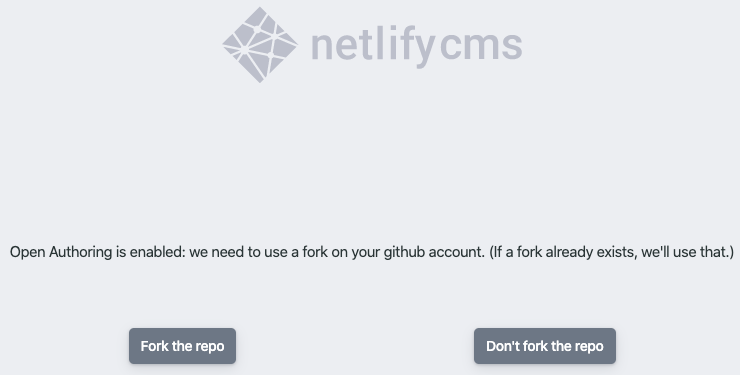
Once authorized, they are given the option to "fork the repo". Choosing "don't fork the repo" simply exits the entire process.
Assuming they choose to fork, they are brought to the editing screen.
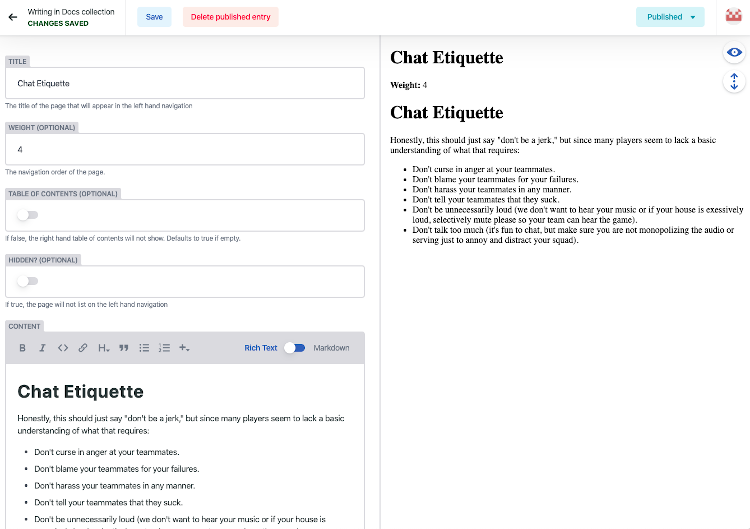
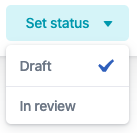
If they make changes, they will need to click the "save" button. After saving, they will need to set the status to "In review", which will automatically submit the change as a pull request to the project.
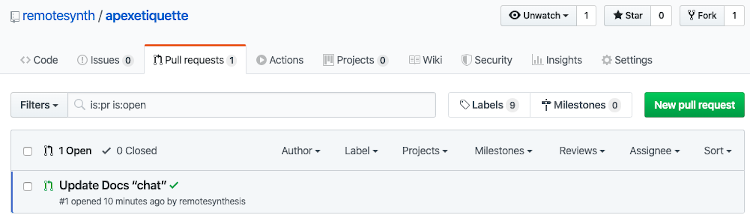
At this point, a pull request has been submitted and we can accept the change via GitHub.
The user can continue to make changes to any of the content in the admin, but these only directly affect their fork and you must approve each as a pull request. If you choose to use open authoring with Netlify CMS, I believe it is critical that part of your documentation includes a detailed guide to the contribution process so that users can understand this process as well.
Where to Go From Here
This is just one example of how to build a docs site - there are a lot of different solutions, some of which we covered, and what you choose may depend heavily on the type of documentation you are creating the audience for it (both in terms of editing and of consuming the content). Which brings us to the hardest part: actually writing good documentation. There's a lot of advice out there for this - and, again, this will depend on the type of documentation and audience - but I recommend checking out Write the Docs for resources, community and events. In addition, Google has a complete guide to technical writing organized by audience and type of documentation. Now let's get documenting! Documentation sites are a longstanding and common use case for the JAMstack. In this post we explore some of the options available to you for developing them and show an example of how to build one.