


Search is an important part of almost any site. Once you have a lot of content, it becomes an especially critical tool for helping your users find what they need. But search is also totally dynamic, so it must be impossible or, at the very least, really difficult to do on a Jamstack site, right?

In this post, we're going to explore adding search to a site built with Gatsby. We'll use a service called Algolia for the search API. This is a commercial offering, but it has a generous free tier. The example site was built with Stackbit, though there's nothing in the code that we'll discuss that is Stackbit specific (for reference, you can see the full project code at https://github.com/remotesynth/good-celery). Ok, enough intro...let's get coding.
Setting Up Algolia
First things first, you'll need to set up your account on Algolia and set up a project. You can skip the steps about setting up indices as we'll take care of that via code. However, be sure to grab all your API keys from the Algolia dashboard as we'll need them later.
Algolia provides two projects that we'll make use of:
- Gatsby Plugin Algolia will help us create our indices and make sure they are kept in sync with our content.
- React InstantSearch provides a pre-built set of tools for interacting with Algolia's search API for a "search as you type" UI. This project also encompasses the
react-instantsearch-domUI tools we'll also use.
Let's start by installing these on our Gatsby project.
npm install gatsby-plugin-algolia react-instantsearch react-instantsearch-dom --saveConfiguring Algolia in Our Gatsby Project
Next we need to edit our gatsby-config.js file, first by adding these two lines prior to the module.exports block.
const queries = require('./src/utils/algolia');
require('dotenv').config();Neither of these files exist yet, but we'll create them in a moment. Staying in gatsby-config.js, within the module.exports block and within the plugins array, add the following details:
{
  resolve: `gatsby-plugin-algolia`,
  options: {
    appId: process.env.GATSBY_ALGOLIA_APP_ID,
    apiKey: process.env.ALGOLIA_ADMIN_KEY,
    queries,
    chunkSize: 10000,
  },
}Finally, create (or open) a .env file and add the API key details from Algolia to the file as follow (replacing the values on the right of the equal signs with the appropriate keys from Algolia)
GATSBY_ALGOLIA_APP_ID=MY_ALGOLIA_APP_ID
GATSBY_ALGOLIA_SEARCH_KEY=MY_ALGOLIA_SEARCH_KEY
GATSBY_ALGOLIA_ADMIN_KEY=MY_ALGOLIA_ADMIN_KEYPlease ensure that this .env file is added to your .gitignore so that you do not accidentally check in your private keys.
Adding Slugs to Posts
In some cases, as in my site generated by Stackbit, pages do not have a slug field in the frontmatter. Having slugs available in the search made it much easier to output the results. Rather than manually add slugs to all of my content, Gatsby provides instructions on how to create slugs for pages automatically.
This depends on gatsby-source-filesystem, so you'll need to install that first. Then, add the following code to gatsby-node.js:
const { createFilePath } = require(`gatsby-source-filesystem`);

exports.onCreateNode = ({ node, getNode, actions }) => {
  const { createNodeField } = actions;
  if (node.internal.type === `MarkdownRemark`) {
    const slug = createFilePath({ node, getNode, basePath: `pages` });
    createNodeField({
      node,
      name: `slug`,
      value: slug
    });
  }
};Now when we query Gastby for our pages, we'll be able to get the slug and provide that to our Algolia search index.
Populating Our Indices
Let's create the queries that will populate our indices on Algolia. It's important to note that your query depends on the data you have in your content and how you store your content. The best way to create and test your GraphQL queries to be sure you will populate your indices correctly is to use GraphiQL, which is running locally whenever you run gatsby develop generally at http://localhost:8000/___graphql.
In my case, my Stackbit site has both pages and posts that have differing frontmatter properties. For this example, we'll be creating a blog search so I created an index that is specific to the blog calles Posts. Feel free to customize your query to create indices for whatever content you wish to make searchable.
Place the query in a /src/utils/algolia.js file like the one below (recall that we referenced this file in our gatsby-config.js file above). Note that the excerpts for the content are truncated to prevent going over the character limit for individual Algolia records.
const postQuery = `{
    posts: allMarkdownRemark(
        filter: { fileAbsolutePath: { regex: "/posts/" } }
    ) {
        edges {
            node {
                objectID: id
                frontmatter {
                    title
                    date(formatString: "MMM D, YYYY")
                    subtitle
                    description: excerpt
                    thumb_image
                }
                fields {
                    slug
                }
                excerpt(pruneLength: 5000)
            }
        }
    }
}`;

const flatten = (arr) =>
  arr.map(({ node: { frontmatter, ...rest } }) => ({
    ...frontmatter,
    ...rest
  }));
const settings = { attributesToSnippet: [`excerpt:20`] };

const queries = [
  {
    query: postQuery,
    transformer: ({ data }) => flatten(data.posts.edges),
    indexName: `Posts`,
    settings
  }
];
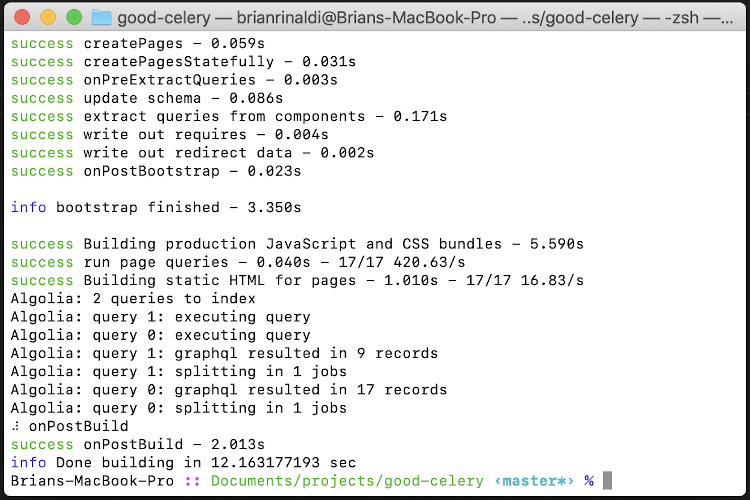
module.exports = queries;With the queries in place, our indices on Algolia will update whenever we build our Gatsby site. To do this, run gatsby build from the command line to run a production build of the site. We should see an indication that our indices have been populated from the console output.
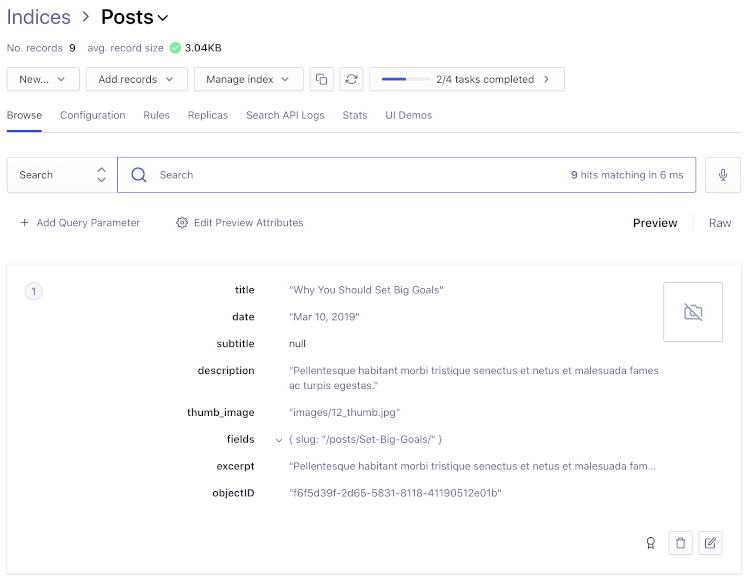
We can now see the results when going into Algolia and browsing Indices.
Creating the Search UI
Now that our search indices are populated, let's display some results. To do this, we're going to use React InstantSearch, which offers a search-as-you-type experience. It pretty much works out of the box using the code they provide.
Let's look at the most basic implementation in action. Start by creating a new template as /src/templates/search.js. This template will just wrap the example code taken almost directly from the InstantSearch page and place it in the site's UI so that we can try it out.
import React from 'react';
import algoliasearch from 'algoliasearch/lite';
import { InstantSearch, SearchBox, Hits } from 'react-instantsearch-dom';
import { Layout } from '../components/index';

const searchClient = algoliasearch(process.env.GATSBY_ALGOLIA_APP_ID, process.env.GATSBY_ALGOLIA_SEARCH_KEY);

export default class Search extends React.Component {
  render() {
    return (
      <Layout {...this.props}>
        <div className="outer">
          <div className="inner">
            <InstantSearch searchClient={searchClient} indexName="Posts">
              <SearchBox />
              <Hits />
            </InstantSearch>
          </div>
        </div>
      </Layout>
    );
  }
}We initialize the search client with the secrets that are in the .env file we created earlier. Within the layout elements, we include the InstantSearch element tied to our Posts index in Algolia. The SearchBox outputs a search input UI and hits outputs the results. Next, just create a search page that will utilize this layout at /src/pages/blog/search.md.
---
title: Search the Blog
template: search
---From the console run gatsby develop and then navigate to the page, which is typically available at http://localhost:8000/blog/search/. Here's what you should see:
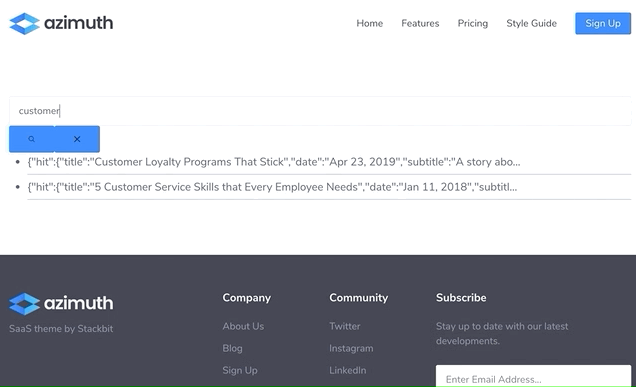
Looks great! We're done!

Customizing the Output
So, ok, our boss has suggested that perhaps we're not quite done yet. She doesn't think the search results are very attractive and, worse yet, they don't even lead anywhere. She has a point.
What if, instead of a separate search page, we actually integrated the search into our existing blog page, allowing a user to filter the results based upon their search? Let's do that and, in doing so, learn how to customize the output of the InstantSearch Hits component.
Create a new component as src/components/search.js using the source below. Don't worry, I'll explain what we're doing in a moment.
import React from 'react';
import algoliasearch from 'algoliasearch/lite';
import { connectHits, InstantSearch, SearchBox } from 'react-instantsearch-dom';
import { Link, safePrefix } from '../utils';
import moment from 'moment-strftime';

const Hits = connectHits(({ hits }) => (
  <div>
    {hits.length ? (
      <div className="post-feed">
        {hits.map((hit) => {
          return (
            <article key={hit.objectID} className="post post-card">
              <div className="post-card-inside">
                <Link className="post-card-thumbnail" to={safePrefix(hit.fields.slug)}>
                  <img className="thumbnail" src={safePrefix(hit.thumb_image)} alt={hit.title} />
                </Link>
                <div className="post-card-content">
                  <header className="post-header">
                    <h2 className="post-title">
                      <Link to={safePrefix(hit.fields.slug)} rel="bookmark">
                        {hit.title}
                      </Link>
                    </h2>
                  </header>
                  <div className="post-excerpt">
                    <p>{hit.description}</p>
                  </div>
                  <footer className="post-meta">
                    <time className="published" dateTime={moment(hit.date).strftime('%Y-%m-%d %H:%M')}>
                      {moment(hit.date).strftime('%B %d, %Y')}
                    </time>
                  </footer>
                </div>
              </div>
            </article>
          );
        })}
      </div>
    ) : (
      <p>There were no results for your query. Please try again.</p>
    )}
  </div>
));

export default function Search({ indexName }) {
  const searchClient = algoliasearch(process.env.GATSBY_ALGOLIA_APP_ID, process.env.GATSBY_ALGOLIA_SEARCH_KEY);
  return (
    <InstantSearch indexName={indexName} searchClient={searchClient}>
      <SearchBox />
      <Hits />
    </InstantSearch>
  );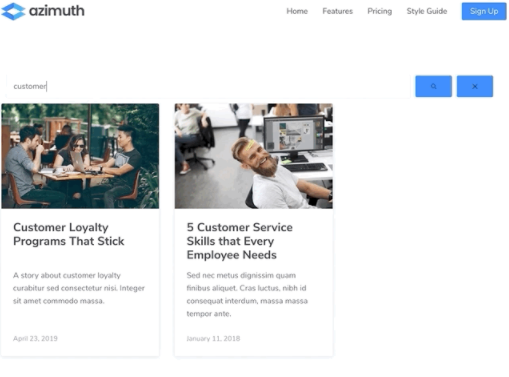
}As you can see, the actual component output UI is almost identical to the prior search page, with just a SearchBox and Hits. However, prior to that, we are overriding the default output behavior of Hits. If the results return any records, we loop through them, outputting cards identical to the existing blog list on src/templates/blog.js, using the hit (i.e. search result) values to populate the output. If there are no results, we just display some text informing the user.
Now let's add it to our blog. Keep in mind that the output of the search results are identical to the regular blog list output and we are using the search without conditionally handling an empty query - this means it will always display posts even if the user has not searched yet. Thus, we can actually replace the regular page output with the search results as in the updated source for src/templates/blog.js below:
import React from 'react';
import _ from 'lodash';
import Search from '../components/Search';

import { Layout } from '../components/index';
import { getPages } from '../utils';

export default class Blog extends React.Component {
  render() {
    let display_posts = _.orderBy(getPages(this.props.pageContext.pages, '/posts'), 'frontmatter.date', 'desc');
    return (
      <Layout {...this.props}>
        <div className="outer">
          <div className="inner">
            <Search indexName="Posts"></Search>
          </div>
        </div>
      </Layout>
    );
  }
}The result works as shown below.
Where to Go From Here
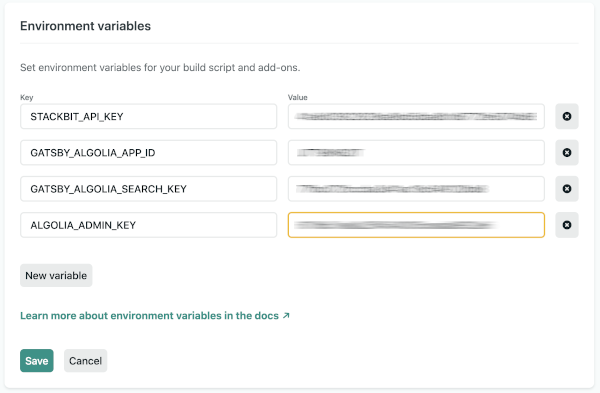
There's one more step that I should mention. We need to ensure that the environment variables we created are available when we deploy. On Netlify, all we need to do is go to Settings > Build & Deploy > Environment and add the necessary variables defined in our .env file to our deployment settings.
We're all set!
Obviously, this is just one way to implement the search. The Gatsby documentation offers a similar but probably more flexible implementation. The InstantSearch documentation also offers a ton of API and customization details with code samples to help you make the tools fit the needs of your specific site. In the end, implementing a search seems like a complicated task, but, thankfully, the tools and libraries available to us do a lot of the heavy lifting, making our jobs much easier. Search is a common site requirement. Let's look at how to populate a search index on Algolia and implement search on a Jamstack site built with Gatsby.