


Stackbit makes it incredibly easy to build and deploy a new Gatsby site without ever touching a line of code. Between clicking "create project" in the Stackbit dashboard until live editing my Gatsby site, takes only around a minute. Since the generated code is in your own GitHub repository, you are free to edit it to your heart's content.
If you are relatively new to Gatsby, perhaps you're wondering about how to make some simple improvements to your site.
Things like:
- Adding a favicon
- Adding Google Analytics or other analytics scripts
- Adding social cards to enhance social media sharing
- Creating a sitemap to submit to search engines.
In this post, we'll cover step by step how to do each of these things.
Note: the examples below were all tested on the Azimuth theme within Stackbit. Other themes use a common structure so in most cases the code and files should largely be the same.
Add a favicon
A favicon is a small icon that will display typically in the tab next to the site's name within the browser, next to the bookmark if the page is bookmarked or on the shortcut if a user saves a shortcut to the site to the desktop of a mobile device. In order to create a favicon, it is best to have multiple versions of the image to match the various sizes needed on differing devices. There are sites that will help you create these such as favicon.io. Let's walk through the steps.
- Start by uploading your image to favicon.io at https://favicon.io/favicon-converter/. This will automatically create the sizes you need. Click the "Download" button to download a zip file with all the images.
- Extract the images from the zip and place them in you site at
/static/images/favicon. In Gatsby, anything in the static folder will be made accessible to your site as assets. You do not need the/staticportion of the path when accessing them within your site. - Open
/src/components/Layout.jsin your project and place the following HTML within the<Helmet>block, for instance, after the CSS stylesheet link.
<link rel="stylesheet" href={safePrefix('assets/css/main.css')}/>
<link rel="apple-touch-icon" sizes="180x180" href="/images/favicon/apple-touch-icon.png"/>
<link rel="icon" type="image/png" sizes="32x32" href="/images/favicon/favicon-32x32.png"/>
<link rel="icon" type="image/png" sizes="16x16" href="/images/favicon/favicon-16x16.png"/>
<link rel="manifest" href="/images/favicon/site.webmanifest"></link>- We'll need to update the location of the images within the provided
/images/favicon/site.webmanifestfile. Open that file and replace the JSON with the follow code (note that you can changenameandshort_nameto whatever suits your project):
{
  "name": "Azimuth",
  "short_name": "Azimuth",
  "icons": [{
    "src": "/images/favicon/android-chrome-192x192.png",
    "sizes": "192x192",
    "type": "image/png"
  }, {
    "src": "/images/favicon/android-chrome-512x512.png",
    "sizes": "512x512",
    "type": "image/png"
  }],
  "theme_color": "#ffffff",
  "background_color": "#ffffff",
  "display": "standalone"
}Now when you run gatsby develop from the command-line/terminal, you should see an icon like in the example below.

Adding Google Analytics
Adding the Google Analytics (or any analytics script really) to a Stackbit site - Gatsby or not - is easy and doesn't require that you edit any code at all. Instead, we'll use a feature in Netlify called snippet injection. Here are the steps:
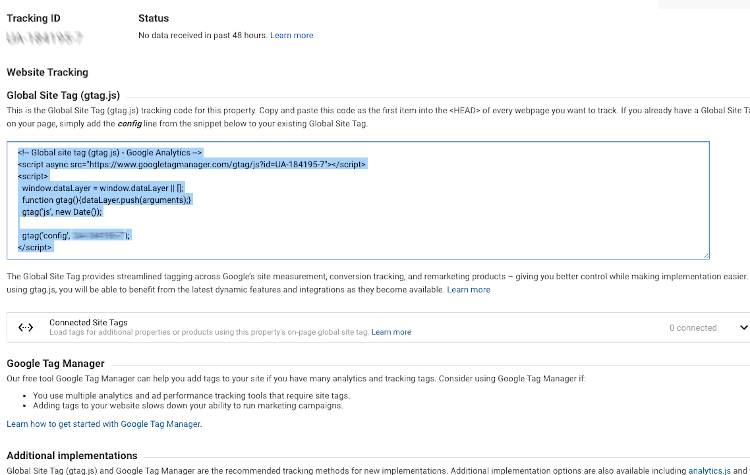
Get the Google Analytics code for your site from Google
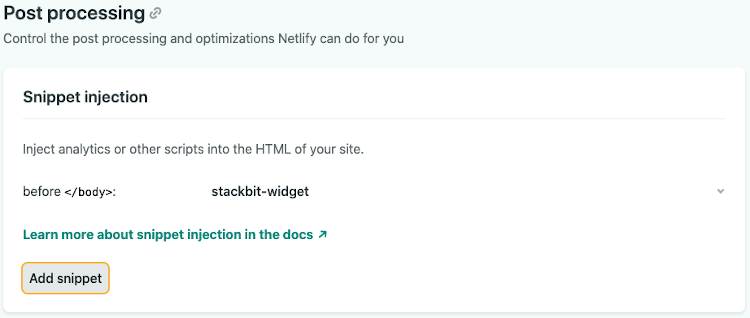
In your site's Netlify dashboard, go to Settings > Build & Deploy > Post Processing and click the "Add Snippet" button.
Choose "before
</head>", which is where Google suggests you place analytics code and then paste your analytics snippet into the provided text box. Hit save.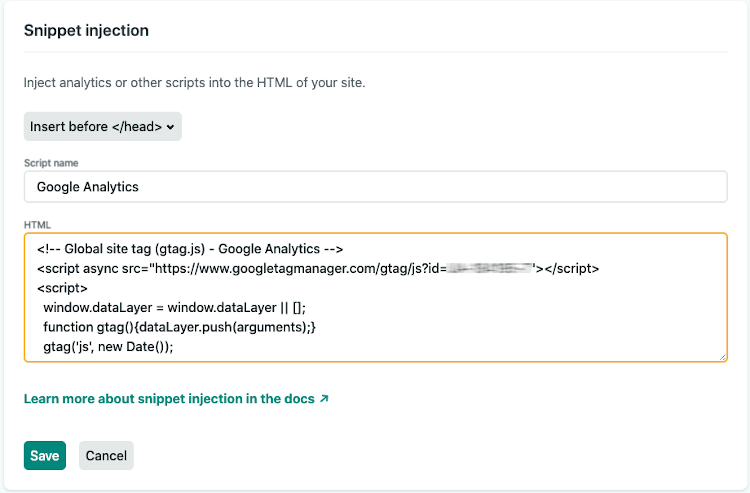
Your site will now automatically have the analytics code injected on every page.
Add Social Sharing Meta Tags
One of the ways to improve the shareability of your site is to add meta tags that improve the way your content appears when shared on social media such as Twitter and Facebook. If you don't know about these meta tags, this article by Adam Coti offers a good primer. But how do you add it to your Gatsby site created by Stackbit? Let's take a look.
I should note that there is a more complete tutorial created by Gatsby, which is also worth reviewing. Some of this code is based upon their tutorial but tweaked for simplicity and to make target for certain Stackbit generated sites. We will also note that this section might not work with some themes out of the box, as it requires author and excerpt fields to be defined.
- Open
site-metadata.jsonfile and find the section with the social links and be sure to add your Twitter username to the end of the Twitter URL as below:javascript ... "social_links": [ { "label": "Twitter", "url": "https://twitter.com/remotesynth", "new_window": true }, { "label": "Instagram", "url": "https://www.instagram.com/", "new_window": true }, { "label": "LinkedIn", "url": "https://www.linkedin.com/", "new_window": true } ], ... - Create a file named
SEO.jsin the/src/components/folder. This will be a reusable component that we can include on templates to output the meta tags for our site. Add the following code toSEO.js:
import React from 'react';
import { Helmet } from 'react-helmet';

function SEO({ description, image, title, author }) {
  return (
    <Helmet
      meta={[
        {
          property: `og:title`,
          content: title
        },
        {
          property: `og:description`,
          content: description
        },
        {
          property: `og:type`,
          content: `website`
        },
        {
          name: `twitter:creator`,
          content: author
        },
        {
          name: `twitter:title`,
          content: title
        },
        {
          name: `twitter:description`,
          content: description
        },
        {
          property: 'og:image',
          content: image
        },
        {
          name: 'twitter:card',
          content: 'summary_large_image'
        }
      ]}
    />
  );
}

export default SEO;This component uses a plugin called React Helmet that comes pre-installed with Stackbit generated Gatsby sites. It is using the description, image, title and author properties passed into it to populate the necessary meta tags and add them to the document <head>.
- Let's add the SEO data to a template. In this case, I'll be editing the blog posts template in the Azimuth theme. To do that, open
/src/templates/post.js. Let's look at what the code will look like and I'll explain it after so that you can edit other themes or templates (note, I have left the main code out and replaced it with...to make this easier to read):
import React from 'react';
import _ from 'lodash';
import moment from 'moment-strftime';
import SEO from '../components/SEO';

import { Layout } from '../components/index';
import { safePrefix, htmlToReact } from '../utils';

export default class Post extends React.Component {
  render() {
    let twitter = '';
    if (_.get(this.props, 'pageContext.site.siteMetadata.footer.has_social') && _.get(this.props, 'pageContext.site.siteMetadata.footer.social_links')) {
      let social_links = _.get(this.props, 'pageContext.site.siteMetadata.footer.social_links');
      let twitter =
        '@' +
        social_links
          .find((element) => element.label === 'Twitter')
          .url.split('/')
          .pop();
    }
    return (
      <Layout {...this.props}>
        <SEO
          title={_.get(this.props, 'pageContext.frontmatter.title')}
          description={_.get(this.props, 'pageContext.frontmatter.excerpt')}
          image={safePrefix(_.get(this.props, 'pageContext.frontmatter.image'))}
          pathname={this.props.location.pathname}
          author={twitter}
        />
        ...
      </Layout>
    );
  }
}First, we need to import the SEO component at the top via import SEO from '../components/SEO'. Inside the render() function, we are getting the Twitter username by splitting it out of the Twitter URL that is in the site-metadata.json file. Finally, we add the SEO component and pass it the necessary properties, which are loaded via Lodash to prevent errors if the value is undefined.
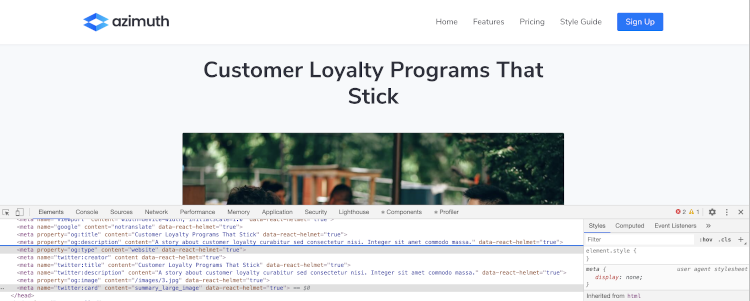
Now if you load a blog post on the site, you can see that the necessary SEO metadata is included in the <head> block. This will result in nicer formatting for shares on social media.
Add a Sitemap
For our last example, we'll add a sitemap.xml to the site. This is useful for submitting to search engines like Google that use this to assist in properly crawling your site. Having a sitemap is another way to improve your site SEO. In this case, we will be utilizing a Gatsby plugin called simply gatsby-plugin-sitemap
- Open the command line/Terminal, navigate to your projects directory and install the plugin.
npm install --save gatsby-plugin-sitemap- Open gatsby-config.js in your code editor. Under the
pluginssection, add an entry forgatsby-plugin-sitemapas below (note that the...is where the other existing plugins listed will exist)
plugins: [
        `gatsby-plugin-sitemap`,
        ...
]- Open
site-metadata.jsonand add an entry forsiteUrlright after the opening curly bracket (aagin, the...represents the rest of the file):
{
    "siteUrl": "https://good-celery-27120.netlify.app/",
    ...
}- This plugin only runs when the site is run in production mode, so to test it, open the command-line/Terminal and use the following command to run your site:
gatsby build && gatsby serveIt's worth noting that the gatsby-plugin-sitemap plugin is configurable. By default it includes every page on your site. Check the documentation for customization options. Step-by-step instructions for adding a favicon, analytics, social sharing meta tags and a site map to your Gatsby site created using the Stackbit site builder.