


Next.js is a great React framework that can be used for server-rendered sites and statically pre-build sites, or both. Until recently, Next.js could be configured to generate static assets for a JAMstack site using automatic static optimization and static HTML export. The latter could be used to generate a JAMstack site with content provided by a headless CMS, yet it lacked some basic features like data pre-fetching and client-side rendering. For example, prefetching the data of a page before clicking the link, and, once the link is clicked, instantly rendering the page on the client without waiting for the browser to load it.
Fortunately, Next.js recently added next-gen static site generation (SSG) support. With these new APIs, it is now possible to configure Next.js to generate JAMstack sites supporting advanced features like data pre-fetching and client-side rendering. And as before, the content of these sites can be driven by a headless CMS. Still, it is not always trivial to configure and integrate Next.js with a headless CMS. Moreover, generating the static assets is only one side of the story — what about the development experience while developing or authoring a static site? In this post, I will discuss some of the areas that can still improve in the Next.js experience for developing JAMstack sites and how a new open source project called Sourcebit can help to fill those gaps.
What's the Optimal JAMstack Setup?
Let's ask ourselves what features would create the optimal development experience for both developers and users for JAMstack sites built with a headless CMS? Personally, I have a number of requirements that I find to be useful when developing or authoring, and later deploying, a JAMstack site. I have divided these requirements into two groups. The first group consists of requirements intended to improve developer experience while developing and authoring a static site. The second group is intended to improve the user experience for users browsing a static site after it has been built and deployed.
DX requirements
- Live update on code change
- when site code is changed, instantly update the currently opened page in the browser using hot module replacement (HMR) or live reload.
- Live update on content change
- when the site content is changed, instantly update the currently opened page in the browser using HMR or live reload. The content can be stored in local files or served via API, for example by a headless CMS.
- Content caching
- when starting a local development server or building a production site, the remote content should be fetched sparingly. Some headless CMS limit the number of monthly requests per pricing plan. If used wastefully, API access might be blocked or incur extra charges. Instead of executing an API call every time a page is requested and pre-rendered, a single API call should be made when the development server starts, fetch the whole content and cache it for future use.
- Observe content changes
- because content is cached, we need to observe content changes and update the cache with a fresh content. The client should be notified about the changes and trigger a live update. To prevent API overuse, observing content should be done in an optimized manner. The changes should be pushed by the content provider rather than being frequently pulled by a server. For example, instead of frequently polling the content provider for content changes, a web-hook or other method of notification should be considered.
- Server-side rendering on page request
- whenever a page is requested, the fully generated page should be returned to the client. For React-based SSGs, the page should be hydrated on the client. Cached content should be used to reduce API usage of external services.
- Client-side rendering on client-side navigation
- whenever internal site navigation occurs, the loaded page should be rendered on the client without triggering a full browser page load.
UX requirements
- Pre-render pages into static files
- Data pre-fetching
- pre-fetch data for pages that link from the current page. There are different strategies to data pre-fetching such as "pre-fetch when a link is scrolled into the view" (Next.js) or "pre-fetch when hovering over a link" (Gatsby).
- Client-side rendering on client side navigation
- whenever internal site navigation occurs, the loaded page should be rendered on client without triggering full browser page load, preemptively triggering a data pre-fetch.
Now that we know what we want, let's see what is missing to achieve it in Next.js. Luckily not much, and the missing requirements are all related to DX.
- Live updates on content change
- right now, Next.js does not have any special capability to update the page when its content changes. In the next section we'll see how it can be solved.
- Content caching
- while content caching is not a Next.js responsibility, it has an issue that prevents using in-memory caching. We can solve this as well.
- Observing content changes
- as with the content caching, observing content changes is not a Next.js responsibility, but specific to the content source itself. In the following section I'll give an example of how content changes can be observed using Sanity's listen API.
Bringing It All Together with Sourcebit
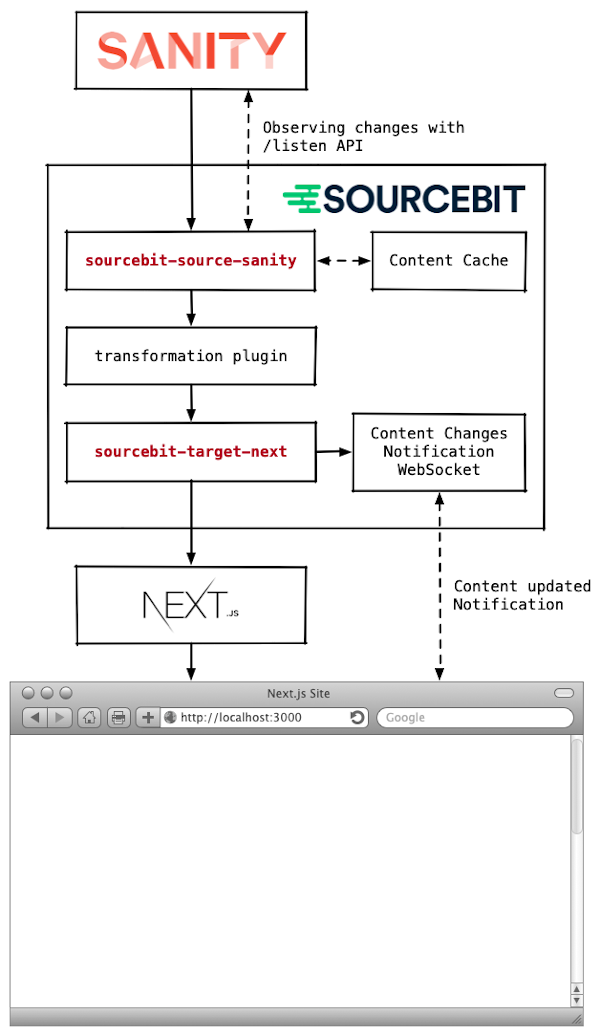
Sourcebit is an open-source tool that closes the gap between headless CMS and static site generators such as Next.js. It is driven by different plugins that fetch data from any possible API source, transform and normalize the data into a format expected by an SSG, and eventually provide that data to the SSG.
Sourcebit also takes responsibility for caching the fetched content and observing content changes.
In the following example, I want to show how Sourcebit can be configured with the sourcebit-source-sanity plugin to fetch content from Sanity.io and the sourcebit-target-next plugin to feed the data to Next.js page components. Sourcebit will take care of fetching content from Sanity, caching it, observing its changes and notifying the client whenever these changes occur, resulting in live updates.
The following diagram shows the flow of content between Sanity.io through Sourcebit and into Next.js and the browser.
You can get the full code for the sample project along with detailed instructions on how to get it running at https://github.com/stackbithq/azimuth-nextjs-sanity
Here's a short video demonstration that shows the live editing in action.
Installing and Configuring Sourcebit
Now to add Sourcebit to your Next.js project run the following command from within your project folder:
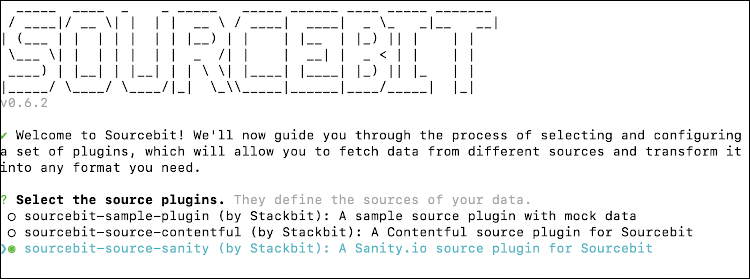
npx create-sourcebitSourcebit uses an interactive setup process that enables you to create the necessary configuration simply by walking through a set of questions via the command line. In the following example, we'll be setting it up to use Sanity as its data source.
Begin by selecting Sanity as the source plugin by using the arrow keys to highlight it and then spacebar to select it and finally hit enter to move to the next step:
For now we'll skip the transformation plugin, so just press enter when the option comes up. The assets transformation plugin can download any assets included in your demo and update any links to them in your content. If you'd like to see how that works, check out this tutorial.
Next, select the target plugin by using the arrow key until it highlights the sourcebit-target-next option and then hitting the spacebar and clicking the enter key.
Sourcebit will begin by walking you through questions required to configure the Sanity source, such as your API token, site ID and dataset. You can read the Sanity documentation to learn more about accessing your API token on Sanity. Once you've completed these steps, we'll begin configuring the Next.js target.
First, we need to tell Sourcebit which models in our Sanity project represent pages in our site. You can select multiple options by using the arrow key and spacebar to select. In the case below, the "blog", "landing", "page" and "post" models all represent pages but, for the sake of example, I will just choose "page" and "post".
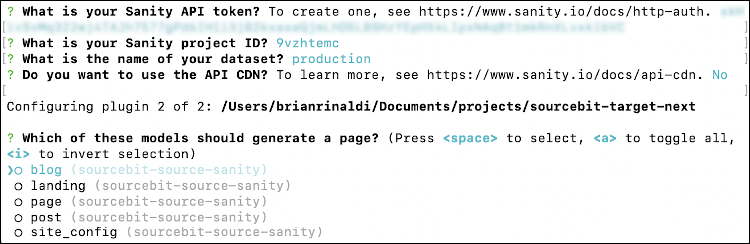
For each selected model, you will then be asked for the path to the page within your Next.js site. The path can use placeholders surrounded by curly braces that represent data associated with the page. For example, the default suggestion for the blog content model is /blog/{slug} whereby slug is a field on the each blog item within Sanity.

The "page" model represents content that will sit at the root of the site, so rather I can enter a custom value for that of /{slug}.
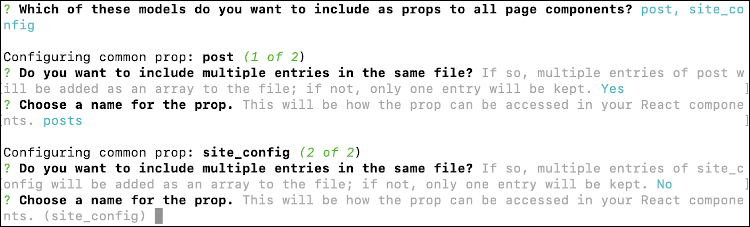
The final step is to choose which content models represent data that we will want to include as props in all pages within our Next.js application. In my case, I want both the "site_config" model and "posts" available.

Sourcebit will give you the option to include multiple entries in the same file. For instance, if this was connected to a data model in Sanity that had more than one entry like "post", you'd choose yes. For the "site_config", however, there is only one entry. You will also be asked to choose a name for the prop, the default being the same as the content model. In my case, I want the default for "site_config" and use posts for "post".
Once the process is complete, Sourcebit will generate the sourcebit.js configuration file. Sourcebit is configured in JavaScript, so you are free to modify and customize it as needed. Below is the configuration generated by the steps above:
module.exports = {
  plugins: [
    {
      module: require('sourcebit-source-sanity'),
      options: {
        accessToken: process.env['SANITY_ACCESS_TOKEN'],
        dataset: 'production',
        projectId: '9vzhtemc',
        useCdn: false
      }
    },
    {
      module: require('sourcebit-target-next'),
      options: {
        pages: function (objects) {
          return objects.reduce((pages, object) => {
            if (object.__metadata.modelName === 'page' && object.__metadata.source === 'sourcebit-source-sanity') {
              return pages.concat({ path: '/{slug}', page: object });
            }

            if (object.__metadata.modelName === 'post' && object.__metadata.source === 'sourcebit-source-sanity') {
              return pages.concat({ path: '/blog/{slug}', page: object });
            }

            return pages;
          }, []);
        },
        commonProps: function (objects) {
          return {
            posts: objects.reduce((acc, object) => (object.__metadata.modelName === 'post' ? acc.concat(object) : acc), []),
            site_config: objects.find((object) => object.__metadata.modelName === 'site_config')
          };
        }
      }
    }
  ]
};Using Sourcebit in Your Next.js Project
In order to connect your Next.js application to the data that Sourcebit provides from the connected sources (Sanity in the case of the above example), you'll need to modify your project's code. First, add following lines to your next.config.js:
const sourcebit = require('sourcebit');
const sourcebitConfig = require('./sourcebit.js');
sourcebit.fetch(sourcebitConfig);Alternatively, instead of including sourcebit.fetch() in your code, you can run Sourcebit in parallel to next dev using:
NODE_ENV=development sourcebit fetch
Next, you'll need to update your page components to get their static paths and static props from Sourcebit:
- Call
sourcebitDataClient.getStaticPaths()from withingetStaticPathsin pages with dynamic routes - Call
sourcebitDataClient.getStaticPropsForPageAtPath(pagePath)from withingetStaticProps, passing the URL path of the page to be rendered. You can compute this path by applyingparamsprovided bygetStaticPropsand the dynamic route pattern of the page component. - Wrap your component with the provided
withRemoteDataUpdateshigher order component (HOC ) to trigger live updates when content changes. This HOC does nothing when Next.js is not in development mode.
Below is an example template that you can use for pages coming from the Sourcebit source data.
// pages/[...slug].js

import React from 'react';
import { sourcebitDataClient } from 'sourcebit-target-next';
import { withRemoteDataUpdates } from 'sourcebit-target-next/with-remote-data-updates';
import pageLayouts from '../layouts';

class Page extends React.Component {
  render() {
    // every page can have be rendered by a sifferent layout,
    // pick the layout based on the model of the page
    const PageLayout = pageLayouts[this.props.page.__metadata.modelName];
    return <PageLayout {...this.props} />;
  }
}

export async function getStaticPaths() {
  const paths = await sourcebitDataClient.getStaticPaths();
  return { paths: paths.filter((path) => path !== '/'), fallback: false };
}

export async function getStaticProps({ params }) {
  const pagePath = '/' + params.slug.join('/');
  const props = await sourcebitDataClient.getStaticPropsForPageAtPath(pagePath);
  return { props };
}

// wrapping Page component to allow live updates
export default withRemoteDataUpdates(Page);The Next.js application is now pulling data directly from Sanity and any updates made in the Sanity Studio will be immediately reflected in the development application. Any changes published will be reflected both in development and in production.
You can view the source code of a complete project built using Sourcebit, Next.js and Sanity at https://github.com/stackbithq/azimuth-nextjs-sanity.
Where To Go From Here
We believe the combination of Sourcebit and Next.js offers developers the power to quickly and easily create powerful, next-generation JAMstack applications. The new features in Next.js truly make it a fantastic choice for the JAMstack and Sourcebit simplifies the process of connecting the application to a variety of data sources.
Also, keep in mind that Sourcebit is completely extensible, meaning that you can create your own source, transformation or target plugins. You can read more about how to do that in the Sourcebit wiki.
For more information about other ways Sourcebit can power your JAMstack applications, check out the project on GitHub or the getting started tutorial on our blog. Next.js recently added a bunch of new features geared specifically for JAMstack sites. In this post, Simon Hanukaev shows how a new project called Sourcebit can help make these even more powerful when working with a CMS-connected site.